Clean Architecture: Express API

Creating a clearly defined, well-documented, and easily readable API is important for making your API easy to use, reducing errors, improving efficiency, and ensuring scalability over time.
When using Express, it is common to initially start by coding everything in the controller/router. This means that all of the logic for handling requests and responses is defined within the router file. This approach can work well for small applications or when getting started with a new project. However, as the application grows and becomes more complex, it may become necessary to refactor parts of the code out of the router and into separate modules. This can help improve the maintainability and scalability of the application over time.
To meet the requirement of a clearly defined, well-documented, and easily readable API, the following steps can be taken:
-
Define a clear API specification: Before starting to write any code, define a clear API specification that outlines all of the endpoints, methods, and parameters that the API will support. This specification should be shared with all members of the development team and any stakeholders involved in the project.
-
Follow a consistent naming convention: Use a consistent naming convention for endpoints, parameters, and other API elements to make it easier for developers to understand how to use the API. For example, use camelCase for parameter names and snake_case for endpoint names.
-
Provide detailed documentation: Write detailed documentation for each endpoint that explains how it works, what parameters it accepts, and what responses it returns. Use examples and sample code snippets to help developers understand how to use the API.
-
Use descriptive error messages: Use descriptive error messages that provide helpful information to developers when an error occurs. Include error codes and links to relevant documentation to help developers troubleshoot issues.
-
Validate inputs and outputs: Validate inputs and outputs to ensure that the API is secure and that it returns the expected results. Use standard validation techniques, such as data type checking and length validation, to prevent errors and improve the reliability of the API.
- Use versioning: Use versioning to ensure that changes to the API do not break existing applications that rely on it. This can be achieved by using URL versioning or header versioning.
By following these steps, the API can become easier to use and understand, which can help improve developer productivity and reduce the risk of errors and bugs. It can also help ensure that the API remains scalable and maintainable over time.
Defining a Clear API Specification
Defining a clear API specification is essential for creating a well-documented and easily readable API. Here are the steps to define a clear API specification:
-
Define the API’s endpoints: URLs that clients can use to interact with the API. Each endpoint should correspond to a specific resource or action within the API. For example, /users might be an endpoint that returns a list of all users.
-
Define the HTTP methods: For each endpoint, define the HTTP methods that are supported, such as GET, POST, PUT, or DELETE. These methods define what actions can be taken on the endpoint.
-
Define the parameters: For each endpoint and HTTP method, define the parameters that are required or optional. These can include query parameters, path parameters, or request body parameters. Each parameter should be well-documented with a clear description and any validation rules.
-
Define the responses: For each endpoint and HTTP method, define the responses that can be returned. These should include both successful and error responses, along with the status codes and any response body data.
-
Define security requirements: If the API requires authentication or other security measures, define these requirements. This can help ensure that all members of the development team are aware of these requirements and can design the API accordingly.
-
Test the API: Once the document is complete, use tools such as Postman to test the API and ensure that it behaves as expected.
By following these steps, you can create a clear and well-documented API specification. This can help ensure that all members of the development team are on the same page about how the API should work and can also be shared with stakeholders to ensure that everyone is aligned on the project goals.
Creating a clear API specification can also help us plan our work as developers. Here are some ways in which this can be beneficial:
-
Prioritize tasks: Identify the endpoints and features that are most critical to the success of the project.
-
Plan dependencies: Identify the endpoints and features that have dependencies on other parts of the application.
-
Estimate development time: Accurately estimate the time required to develop each endpoint or feature.
-
Identify potential challenges: Identify potential challenges or roadblocks.
-
Collaborate with team members: Facilitate collaboration among team members by providing a common understanding of how the API should work.
In summary, creating a clear API specification can help us plan our work as developers by prioritizing tasks, planning dependencies, estimating development time, identifying potential challenges, and facilitating collaboration with team members.
Express
Express is a framework that developers can use to build web applications with Node.js. It’s popular because it’s easy to use, flexible, and scalable. With Express, you can handle HTTP requests and responses, define routes, and manage middleware functions. It’s also easy to integrate with other Node.js modules and libraries. Overall, it’s a great tool for building web applications quickly and efficiently.
To get started with Express and TypeScript, you’ll need to do the following:
Install Node.js and npm: https://nodejs.org/en/download
Create a new project: Open your terminal or command prompt and navigate to the directory where you want to create your project. Then run the following commands to create a new Node.js project with TypeScript:
mkdir my-express-app
cd my-express-app
npm init -y
npm install express @types/express typescript ts-node-dev
This will create a new directory called “my-express-app” and initialize a new Node.js project with TypeScript. It will also install the necessary dependencies, including Express, the TypeScript compiler, and ts-node-dev, a tool that allows you to run your TypeScript code without compiling it first.
Write some code: Now you’re ready to write some code! Create a new directory called “src” and add a new file called “server.ts”. This will be the entry point of your application. Here’s some sample code to get you started:
import express, { Application } from 'express';
const app: Application = express();

app.get('/', (req, res) => {
    res.send('Hello, World!');
});

// Start your Express server
app.listen(3000, () => {
    console.log('Server started on http://localhost:3000');
});
You can add a start script to your package.json file that runs your Express app using ts-node-dev. Here’s an example:
{
  "name": "clean_api",
  "version": "1.0.0",
  "description": "",
  "main": "index.js",
  "scripts": {
    "start": "ts-node-dev src/server.ts"
  },
  "keywords": [],
  "author": "",
  "license": "ISC",
  "dependencies": {
    "express": "^4.18.2"
  },
  "devDependencies": {
    "@types/express": "^4.17.17",
    "ts-node-dev": "^2.0.0",
    "typescript": "^5.0.2"
  }
}
To start your app using the start script, simply run the following command in your terminal or command prompt:
npm startMiddleware
Express middleware refers to a function or a series of functions that are executed in the request-response cycle of an Express application. These functions have access to the request and response objects, and they can manipulate them, execute additional code, or terminate the request-response cycle.
Middleware functions in Express are registered using the app.use() method and are executed sequentially in the order they are registered.
Express and Swagger
There are several ways to document API routes in Express, but one of the most popular approaches is to use a tool called Swagger. Swagger is an open-source tool that allows you to describe, document, and test your APIs using a standardized format called OpenAPI Specification (formerly known as Swagger Specification).
To use Swagger with Express, you can use a middleware called “swagger-ui-express” that provides a user interface to interact with your API documentation. Here are the general steps to follow:
Install the “swagger-ui-express” and “swagger-jsdoc” packages:
npm install swagger-ui-express swagger-jsdoc @types/swagger-jsdoc @types/swagger-ui-express --save-devCreate a new file called “swagger.ts” or similar, where you will define your API documentation. Here’s an example:
import express, { Application } from 'express';
import swaggerJsDoc from 'swagger-jsdoc';
import swaggerUi from 'swagger-ui-express';

const options = {
    definition: {
        openapi: '3.0.0',
        info: {
            title: 'My API',
            version: '1.0.0',

            description: 'API documentation',
        },
        servers: [
            {
                url: 'http://localhost:3000',
            },
        ],
    },
    apis: ['./src/routes/*.ts'], // Path to the API routes
};

const specs = swaggerJsDoc(options);

export default (app: Application) => {
    app.use('/api-docs', swaggerUi.serve, swaggerUi.setup(specs));
};
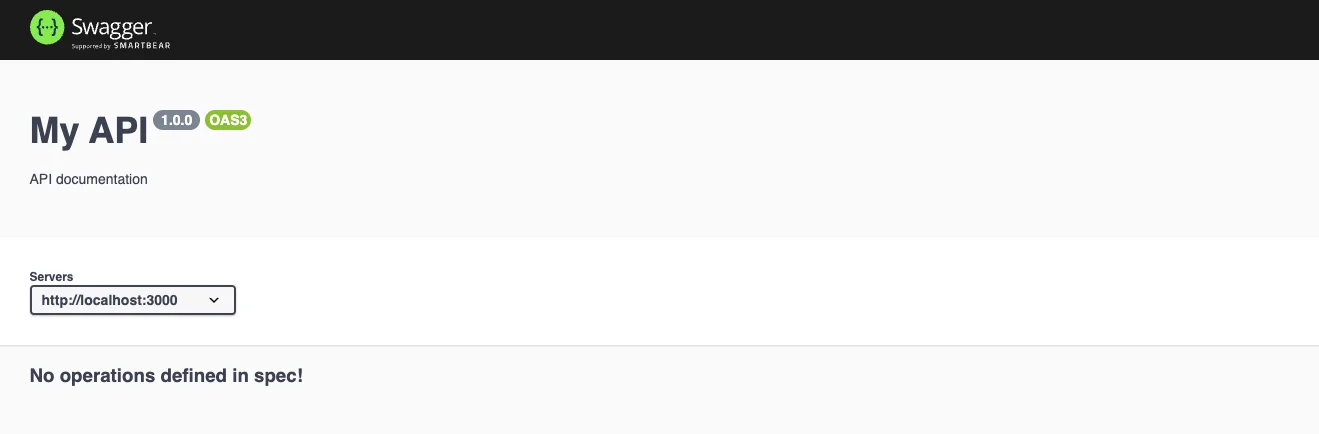
This file defines the Swagger options, including the API title, version, and description. It also specifies the API servers and the path to the API routes. Finally, it exports a function that takes an Express app instance and adds the Swagger middleware to serve the API documentation at the “/api-docs” endpoint.
Add the Swagger middleware to your Express app by modifying the server.ts file:
import express, { Application } from 'express';
import Swagger from './swagger'****

const app: Application = express();

Swagger(app);

app.get('/', (req, res) => {
    res.send('Hello, World!');
});

// Start your Express server
app.listen(3000, () => {
    console.log('Server started on http://localhost:3000');
});
Because no routes exist we see the followng: